Welcome to Part 4 of my Blog Series on building my Zscaler Lab. We started with the basic essentials of setting up User Authentication via Azure Entra ID as our Identity Provider. Now that we have users and groups sync’d from the on Prem AD to Azure and into Zscaler via Entra ID, we can begin creating policy for what those users can connect to, both on the Public Internet and Private Applications in the data center.
First question I usually get is, “Yeah but how are you getting connected?”

That answer is pretty easy, we deploy a lightweight traffic forwarding agent called the Zscaler Client Connector. No actual data processing happens on device. All it does is make a validated connection to the Zscaler cloud, and then everything happens there.
Your Traffic and Application access are always under Your control.
Simply because Zscaler is a Cloud Network and Security service , many people assume Zscaler takes control of your traffic. This is not the case. Every Zscaler customer is in full control of everything their devices are doing while connected to the Zscaler Cloud. It’s the Policy that is created that dictates where things go. See Reference Architecture for Traffic Forwarding for more information.
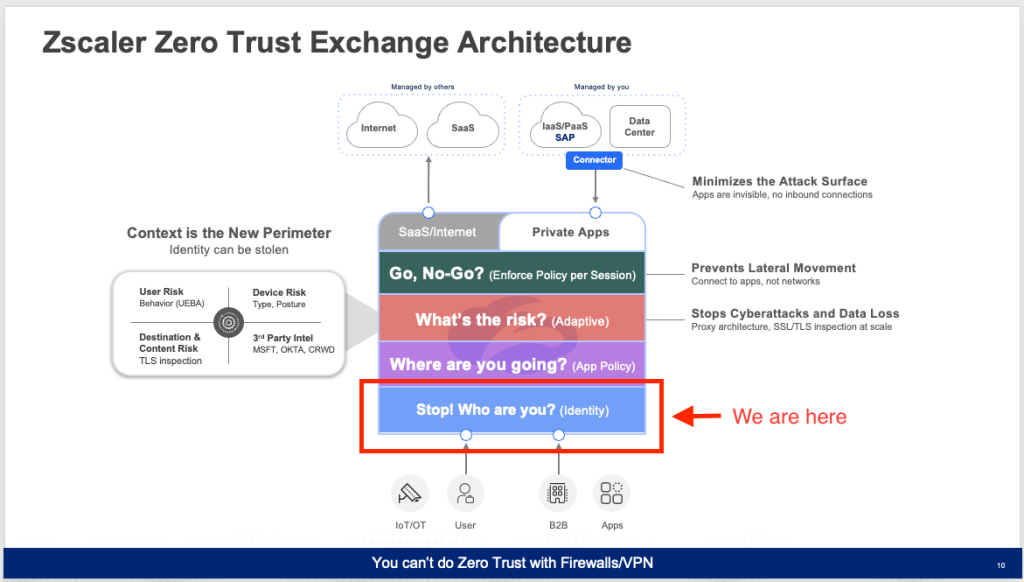
Policy Flow

The ZIA service edges feature two main modules: Web and Firewall, for policy enforcement. It’s important to understand the flow order and process by which Zscaler handles Policy Enforcement. Here’s a run down.
■Outbound traffic first encounters the Firewall (FW) module. If it’s web traffic and complies with FW policies, it’s forwarded to the Web module for policy evaluation.
■If web traffic violates a firewall policy, both Firewall and Web Insights logs will show the traffic as blocked.
■Conversely, if the traffic clears the firewall policy but fails a web policy, the Firewall Insights logs will mark it as allowed, while the Web Insights logs will record it as blocked.
■Should a web policy permit a transaction but a firewall policy opposes it, the firewall policy prevails.
■In the Web module, traffic violating a web policy is blocked. This module evaluates policies based on the traffic type—TLS or Plain HTTP.
■For SSL or TLS traffic, the ZIA Public Service Edges’ policy assessment and implementation depend on settings like traffic forwarding method, SSL inspection actions, and policies for CONNECT requests or SNI.
Following these guidelines you’ll start building your Policy Framework.

Deconstructing Policy Components
| High Level Use Case | Security Controls | Notes |
| Who can access What? (Network level) | Firewall Control, DNS Control, IPS ControlWho? (All)What? (IP Address and FQDN)Access Medium? (Network Services) | No visibility into Application data IPS limited to signatures applicable for visible info i.e. protocol headers barring application data |
| Who can access What? (Application level)without SSL Inspection | CloudApp Control, URL Control, Browser Control(?)Who? (All)What? (URLs, CloudApps)Access Medium? (Application Protocols, User agent, etc.) | With “SSL Inspection == OFF”, Destination identification and classification limited to “HTTP GET- Host” info for HTTP traffic and “SNI” info for SSL/HTTPS trafficNo visibility into accessed Content (payload) and henceforth following are unavailable,Advanced URL and CloudApp Control (additional context with SSL inspection)File Type controlData Loss Prevention |
| + Who can perform What? (with SSL Inspection )Granular controls within a given application for different user activities | CloudApp Control, URL Control;File Type Control, Sandbox;Data Loss Prevention;Who? (All)What? (URLs, CloudApps)Access Medium? (Application Protocols, User agent, etc.) | With “SSL Inspection == ON”, Complete visibility into accessed Content offers Full Control |
Hopefully this helps you start to get going on your Policy Framework.
-Britton